| 1 |
# Application Setup |
| 2 |
|
| 3 |
## Basic Hardware/Software Setup |
| 4 |
Hock up your Serial Cable to the Handbox and the USB-To-Serial Adapter and connect the USB-To-Serial Adapter to the Pi/Computer. |
| 5 |
|
| 6 |
Enter the Command: |
| 7 |
> ``ls -l /dev/ttyUSB*`` |
| 8 |
|
| 9 |
To see if a Serial device has appeared. |
| 10 |
This device name is required to configure the driver. |
| 11 |
If not, use: |
| 12 |
|
| 13 |
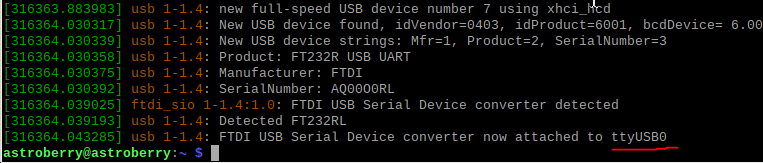
> ``dmesg`` |
| 14 |
|
| 15 |
to see if your adapter has appeared under a different name: |
| 16 |
|
| 17 |
 |
| 18 |
|
| 19 |
**Note:** Device enumeration in linux is sometimes arbitrary, and if multiple USB-to-Serial devices exist, those may be shuffled around. Keep in mind, that the driver does not know what device is connected using which device node. |
| 20 |
See [Troubleshooting](Troubleshooting.md) if this problem occurs. |
| 21 |
|
| 22 |
### Start and Setup Astroberry Indi Server |
| 23 |
Astroberry is the hub of your setup so power up you pi and wait until its booted. |
| 24 |
|
| 25 |
To start open a webbrowser to and enter the IP-Address or DNS-Name of your raspberry pi running astroberry: |
| 26 |
> http://ip.of.your.pi/ |
| 27 |
or |
| 28 |
> http://astroberry/ |
| 29 |
|
| 30 |
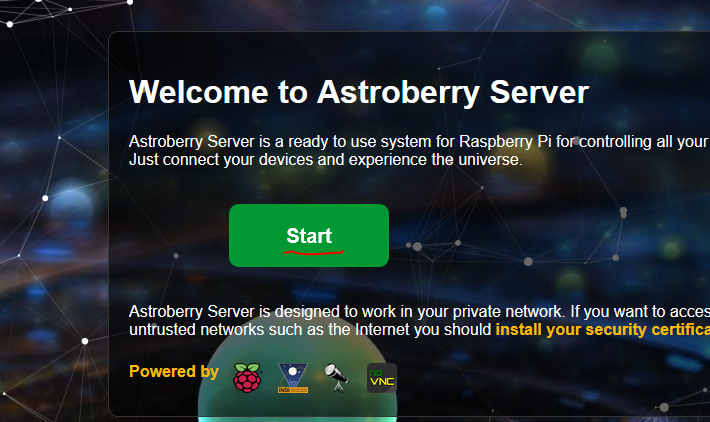
On the start up page, click simply click "Start". |
| 31 |
 |
| 32 |
|
| 33 |
Loading the next page may take some time. |
| 34 |
|
| 35 |
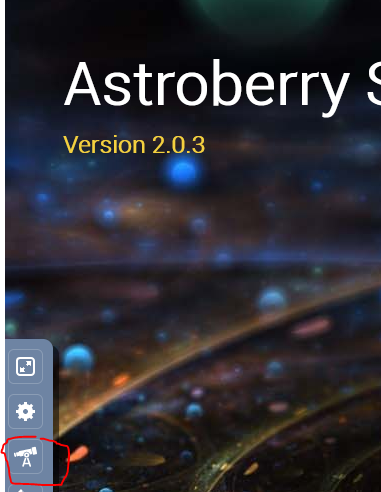
Initially you need to create a new setup profile in astroberry server to do this click the tiny telescope icon in the small side bar on the left. |
| 36 |
|
| 37 |
 |
| 38 |
|
| 39 |
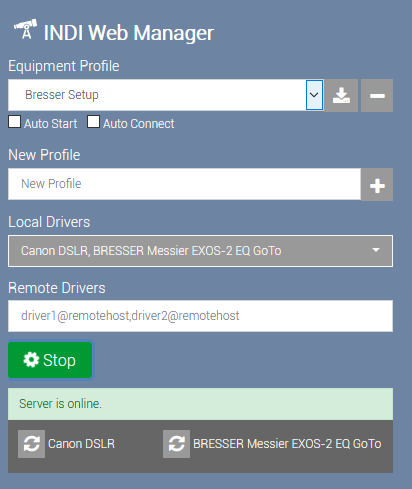
The INDI Web Manager panel appears. |
| 40 |
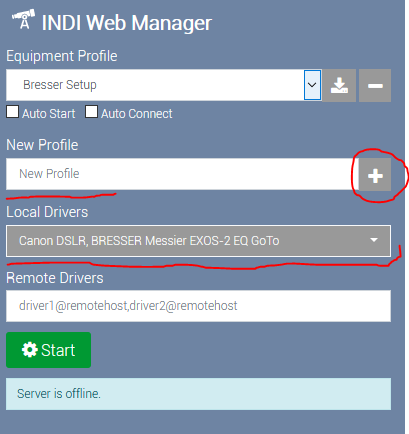
Set an name in the "New Profile" text box and select your devices in the "Local Drivers" combobox as shown in the example. |
| 41 |
|
| 42 |
 |
| 43 |
|
| 44 |
press the "plus" button to add the profile to your configurations. |
| 45 |
|
| 46 |
After selecting the configuration from the "Equipment Profile" combo box click the start button to actually launch the server. |
| 47 |
|
| 48 |
 |
| 49 |
|
| 50 |
It should state "Server is online" in green, and the "Gear" in the "Stop" button should be spinning. |
| 51 |
|
| 52 |
On the next setup of your equipment it suffices to select the "Equipment Profile" and hit "Start" again to get up and running. |
| 53 |
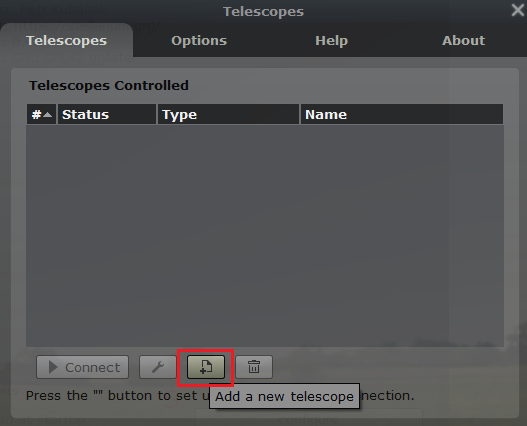
|
| 54 |
This concludes the INDI Setup part. |
| 55 |
|
| 56 |
### Choose Prefered Operation Mode |
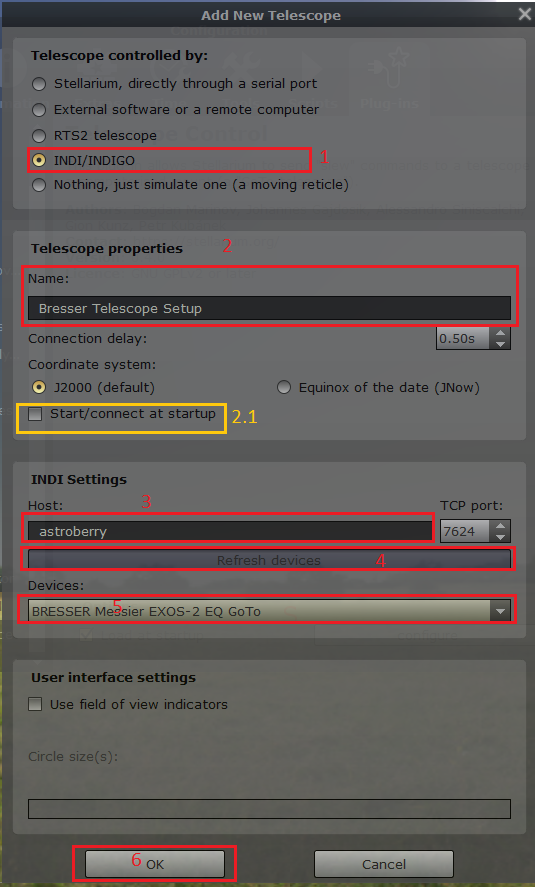
| 57 |
You can either choose to use VNC connection to run your Astronomy Software on the Pi directly or use a dedicated client to connect to the INDI Server. Both ways work analogous. |
| 58 |
|
| 59 |
### KStars |
| 60 |
Start KStars and perform the Initial Wizard, if not already concluded priorly. |
| 61 |
|
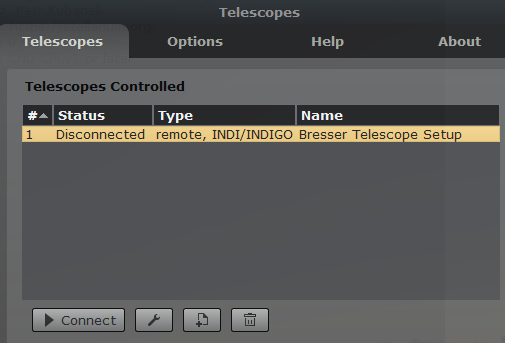
| 62 |
When done open the "Ekos" Window by clicking the tiny dome Icon in tool bar. |
| 63 |
|
| 64 |
 |
| 65 |
|
| 66 |
This process may also nag you with a "Ekos Profile Wizard". You can simply close it. |
| 67 |
|
| 68 |
Initially it should only contain a "Simulators" profile, ignor it and create a new one, by clicking at the "plus" icon. |
| 69 |
|
| 70 |
 |
| 71 |
|
| 72 |
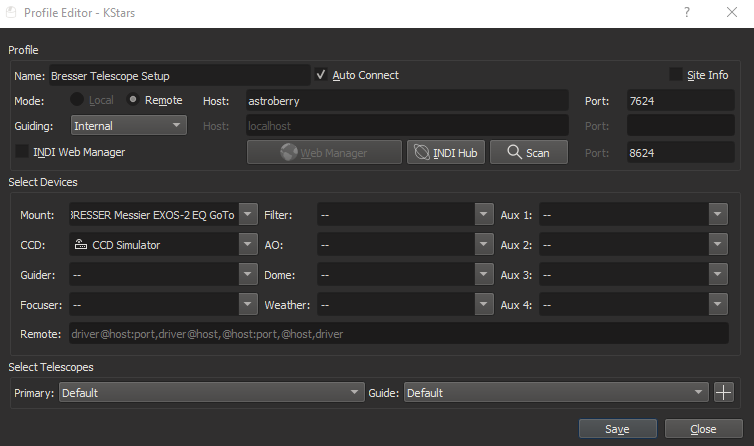
The window poping up queries some information from your. To set a profile on a choose a name and enter the IP address of your Raspberry Pi running astroberry (if you use a VNC connection to the PI you can go with "localhost"). |
| 73 |
|
| 74 |
The Kstars Ekos dialog requires you to select at least a mount and a ccd elsewise it refuses to start. |
| 75 |
|
| 76 |
 |
| 77 |
|
| 78 |
You have to enter "BRESSER Messier EXOS-2 EQ GoTo" (simply copy and paste) manually in the Mount Driver Combobox, since kstars does not list this remote devices (at least not in my case). |
| 79 |
|
| 80 |
If you do not have as CCD, go with "CCD Simulator" which should be selectable from the combobox. |
| 81 |
|
| 82 |
Click save to complete the setup. |
| 83 |
|
| 84 |
After finishing select your newly created profile from the "Profile" combobox and click the "play arrow" |
| 85 |
|
| 86 |
 |
| 87 |
|
| 88 |
The "INDI Control Panel" will pop up, signaling everything is running. |
| 89 |
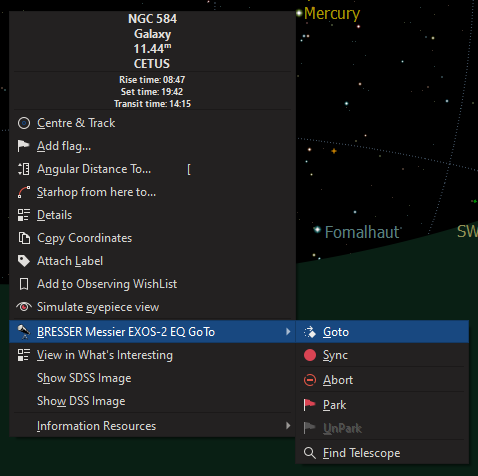
You should be able to "unpark" your telescope from the Star panel now and issue pointing commands using the context menu. |
| 90 |
|
| 91 |
 |
| 92 |
|
| 93 |
### Stellarium |
| 94 |
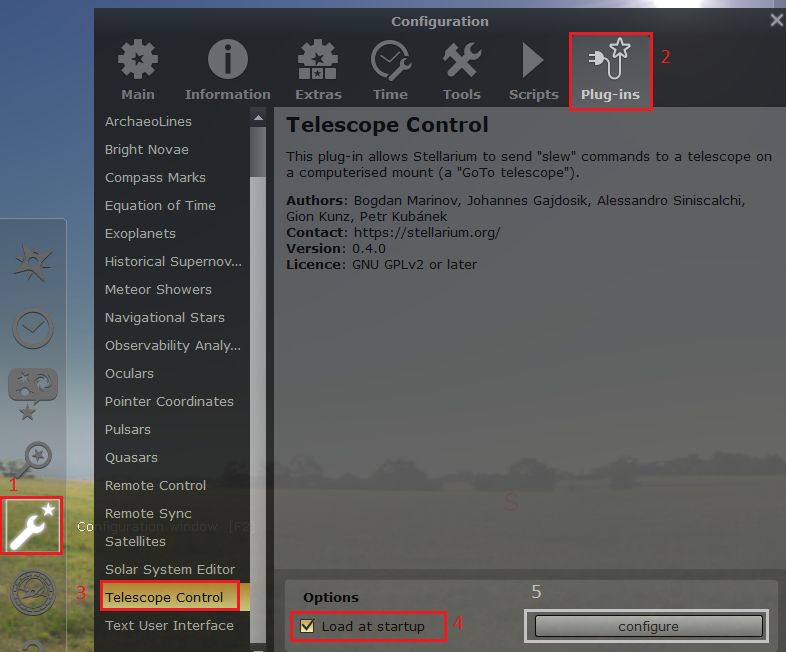
Start up Stellarium and open the settings dialog to activate the "Telescope Control" plugin. |
| 95 |
|
| 96 |
 |
| 97 |
|
| 98 |
Click on the elements in the annotated order to navigate to the target, after setting the "Load at startup" checkbox you have to restart Stellarium. |
| 99 |
The "Configure" (5) button is disabled unless Stellarium is restarted. |
| 100 |
|
| 101 |
After restart, click the "Configure" (5) button to open the Configuration window. |
| 102 |
|
| 103 |
 |
| 104 |
|
| 105 |
Unless you already setup a telescope setup the list sould be empty. |
| 106 |
Click the "Add a new telescope" Button to create a profile. |
| 107 |
|
| 108 |
It opens another window. |
| 109 |
|
| 110 |
 |
| 111 |
|
| 112 |
In this screen select "INDI/INDIGO" (1). |
| 113 |
|
| 114 |
Choose a name in the "Name" panel (2). |
| 115 |
|
| 116 |
You may also enable "Start/connect at startup" (2.1) optionally, you can enable this later once you verified everything is working. |
| 117 |
|
| 118 |
Select the "Host" address (3) and click "Refresh devices", your Mount name should appear in the "Devices" combobox (5). Select the "BRESSER Messier EXOS-2 EQ GoTo" |
| 119 |
|
| 120 |
After assuring your settings, click the "OK" button (6) to finish configuration. |
| 121 |
|
| 122 |
You should end up in the window from before, however it now contains the profile you just created, you can click "Connect" to |
| 123 |
|
| 124 |
 |
| 125 |
|
| 126 |
Open the "Help" panel to learn how to use this plug in. |
| 127 |
Use `CTRL`+`0` to open the slew dialog. |
| 128 |
|
| 129 |
In Stellarium commands to for GoTo are supported, no parking or stopping, but it updates the telescope pointing coordinates in the Sky View. |
| 130 |
|
| 131 |
**Note:** As of the time of the creation of the guide, Stellarium would not issue the necessary commands, and only would show your telescope pointing coordinates when the first "goto" command was issued. |