| 1 |
--- |
| 2 |
title: Host on Cloudflare |
| 3 |
description: Host your site on Cloudflare. |
| 4 |
categories: [] |
| 5 |
keywords: [] |
| 6 |
--- |
| 7 |
|
| 8 |
Use these instructions to enable continuous deployment from a GitHub repository. The same general steps apply if you are using GitLab for version control. |
| 9 |
|
| 10 |
## Prerequisites |
| 11 |
|
| 12 |
Please complete the following tasks before continuing: |
| 13 |
|
| 14 |
1. [Create](https://dash.cloudflare.com/sign-up) a Cloudflare account |
| 15 |
1. [Log in](https://dash.cloudflare.com/login) to your Cloudflare account |
| 16 |
1. [Create](https://github.com/signup) a GitHub account |
| 17 |
1. [Log in](https://github.com/login) to your GitHub account |
| 18 |
1. [Create](https://github.com/new) a GitHub repository for your project |
| 19 |
1. [Create](https://git-scm.com/docs/git-init) a local Git repository for your project with a [remote](https://git-scm.com/docs/git-remote) reference to your GitHub repository |
| 20 |
1. Create a Hugo project within your local Git repository and test it with the `hugo server` command |
| 21 |
|
| 22 |
## Procedure |
| 23 |
|
| 24 |
Step 1 |
| 25 |
: Create a `wrangler.toml` file in the root of your project. |
| 26 |
|
| 27 |
```toml {file="wrangler.toml" copy=true} |
| 28 |
name = 'hosting-cloudflare-worker' |
| 29 |
compatibility_date = '2025-07-31' |
| 30 |
|
| 31 |
[build] |
| 32 |
command = 'chmod a+x build.sh && ./build.sh' |
| 33 |
|
| 34 |
[assets] |
| 35 |
directory = './public' |
| 36 |
not_found_handling = '404-page' |
| 37 |
``` |
| 38 |
|
| 39 |
Step 2 |
| 40 |
: Create a `build.sh` file in the root of your project. |
| 41 |
|
| 42 |
```sh {file="build.sh" copy=true} |
| 43 |
#!/usr/bin/env bash |
| 44 |
|
| 45 |
#------------------------------------------------------------------------------ |
| 46 |
# @file |
| 47 |
# Builds a Hugo site hosted on a Cloudflare Worker. |
| 48 |
# |
| 49 |
# The Cloudflare Worker automatically installs Node.js dependencies. |
| 50 |
#------------------------------------------------------------------------------ |
| 51 |
|
| 52 |
# Exit on error, undefined variables, or pipe failures |
| 53 |
set -euo pipefail |
| 54 |
|
| 55 |
build_temp_dir="" |
| 56 |
|
| 57 |
# Perform cleanup |
| 58 |
cleanup() { |
| 59 |
if [[ -n "${build_temp_dir:-}" && -d "${build_temp_dir}" ]]; then |
| 60 |
rm -rf "${build_temp_dir}" |
| 61 |
fi |
| 62 |
} |
| 63 |
|
| 64 |
# Register the cleanup trap |
| 65 |
trap cleanup EXIT SIGINT SIGTERM |
| 66 |
|
| 67 |
main() { |
| 68 |
# Define tool versions |
| 69 |
DART_SASS_VERSION=1.99.0 |
| 70 |
GO_VERSION=1.26.2 |
| 71 |
HUGO_VERSION=0.161.1 |
| 72 |
NODE_VERSION=24.15.0 |
| 73 |
|
| 74 |
# Set the build timezone |
| 75 |
export TZ=Europe/Oslo |
| 76 |
|
| 77 |
# Create and move into a temporary directory for downloads |
| 78 |
build_temp_dir=$(mktemp -d) |
| 79 |
pushd "${build_temp_dir}" > /dev/null |
| 80 |
|
| 81 |
# Create the local tools directory |
| 82 |
mkdir -p "${HOME}/.local" |
| 83 |
|
| 84 |
# Install Dart Sass |
| 85 |
echo "Installing Dart Sass ${DART_SASS_VERSION}..." |
| 86 |
curl -sLJO "https://github.com/sass/dart-sass/releases/download/${DART_SASS_VERSION}/dart-sass-${DART_SASS_VERSION}-linux-x64.tar.gz" |
| 87 |
tar -C "${HOME}/.local" -xf "dart-sass-${DART_SASS_VERSION}-linux-x64.tar.gz" |
| 88 |
export PATH="${HOME}/.local/dart-sass:${PATH}" |
| 89 |
|
| 90 |
# Install Go |
| 91 |
echo "Installing Go ${GO_VERSION}..." |
| 92 |
curl -sLJO "https://go.dev/dl/go${GO_VERSION}.linux-amd64.tar.gz" |
| 93 |
tar -C "${HOME}/.local" -xf "go${GO_VERSION}.linux-amd64.tar.gz" |
| 94 |
export PATH="${HOME}/.local/go/bin:${PATH}" |
| 95 |
|
| 96 |
# Install Hugo |
| 97 |
echo "Installing Hugo ${HUGO_VERSION}..." |
| 98 |
curl -sLJO "https://github.com/gohugoio/hugo/releases/download/v${HUGO_VERSION}/hugo_${HUGO_VERSION}_linux-amd64.tar.gz" |
| 99 |
mkdir -p "${HOME}/.local/hugo" |
| 100 |
tar -C "${HOME}/.local/hugo" -xf "hugo_${HUGO_VERSION}_linux-amd64.tar.gz" |
| 101 |
export PATH="${HOME}/.local/hugo:${PATH}" |
| 102 |
|
| 103 |
# Install Node.js |
| 104 |
echo "Installing Node.js ${NODE_VERSION}..." |
| 105 |
curl -sLJO "https://nodejs.org/dist/v${NODE_VERSION}/node-v${NODE_VERSION}-linux-x64.tar.xz" |
| 106 |
tar -C "${HOME}/.local" -xf "node-v${NODE_VERSION}-linux-x64.tar.xz" |
| 107 |
export PATH="${HOME}/.local/node-v${NODE_VERSION}-linux-x64/bin:${PATH}" |
| 108 |
|
| 109 |
# Return to the project root |
| 110 |
popd > /dev/null |
| 111 |
|
| 112 |
# Verify installations |
| 113 |
echo "Verifying installations..." |
| 114 |
echo Dart Sass: "$(sass --version)" |
| 115 |
echo Go: "$(go version)" |
| 116 |
echo Hugo: "$(hugo version)" |
| 117 |
echo Node.js: "$(node --version)" |
| 118 |
|
| 119 |
# Configure Git |
| 120 |
echo "Configuring Git..." |
| 121 |
git config core.quotepath false |
| 122 |
if [ "$(git rev-parse --is-shallow-repository)" = "true" ]; then |
| 123 |
git fetch --unshallow |
| 124 |
fi |
| 125 |
|
| 126 |
# Build the site |
| 127 |
echo "Building the site..." |
| 128 |
hugo build --gc --minify |
| 129 |
} |
| 130 |
|
| 131 |
main "$@" |
| 132 |
``` |
| 133 |
|
| 134 |
Step 3 |
| 135 |
: Commit the changes to your local Git repository and push to your GitHub repository. |
| 136 |
|
| 137 |
Step 4 |
| 138 |
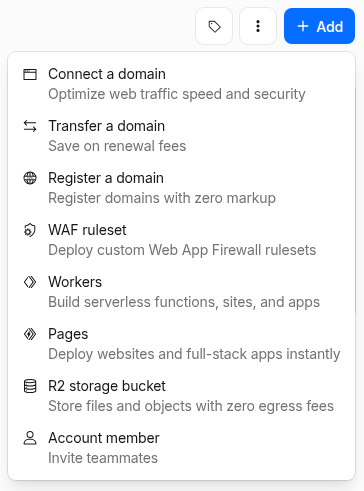
: In the upper right corner of the Cloudflare [dashboard](https://dash.cloudflare.com/), press the **Add** button and select "Workers" from the drop down menu. |
| 139 |
|
| 140 |
 |
| 141 |
|
| 142 |
Step 5 |
| 143 |
: Verify your account if prompted. |
| 144 |
|
| 145 |
 |
| 146 |
|
| 147 |
Step 6 |
| 148 |
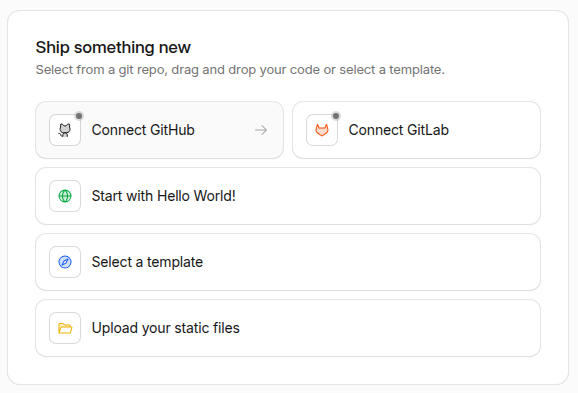
: On the "Create a Worker" page, under the "Ship something new" heading, press the **Connect GitHub** button. |
| 149 |
|
| 150 |
 |
| 151 |
|
| 152 |
Step 7 |
| 153 |
: Select the GitHub account where you want to install the Cloudflare Workers and Pages application. |
| 154 |
|
| 155 |
 |
| 156 |
|
| 157 |
Step 8 |
| 158 |
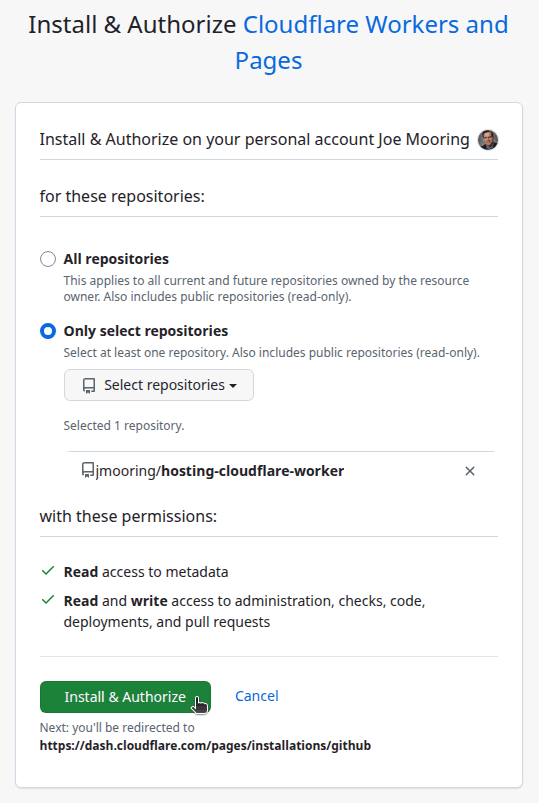
: Authorize the Cloudflare Workers and Pages application to access all repositories or only select repositories, then press the **Install & Authorize** button. |
| 159 |
|
| 160 |
 |
| 161 |
|
| 162 |
Step 9 |
| 163 |
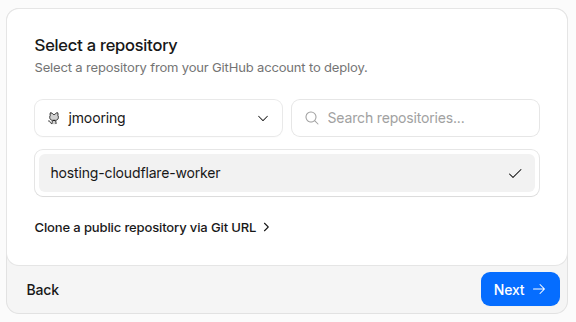
: On the "Create a Worker" page, under the "Select a repository" heading, select the repository to deploy, then press the **Next** button. |
| 164 |
|
| 165 |
 |
| 166 |
|
| 167 |
Step 10 |
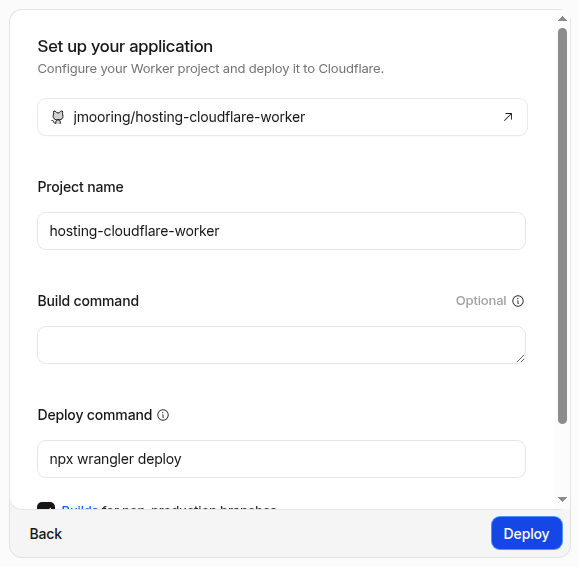
| 168 |
: On the "Create a Worker" page, under the "Set up your application" heading, provide a project name, leave the build command blank, then press the **Deploy** button. |
| 169 |
|
| 170 |
 |
| 171 |
|
| 172 |
Step 11 |
| 173 |
: Wait for the site to build and deploy, then press the **Visit** button in the upper left corner of your screen. |
| 174 |
|
| 175 |
 |
| 176 |
|
| 177 |
In the future, whenever you push a change from your local Git repository, Cloudflare will rebuild and deploy your site. |